
While square, minimalist trim is a current trend and new construction doesn’t always feature it, quarter-round and/or shoe molding will always be a classic, elevated look in homes and businesses. A great solution for hiding the edges of floating flooring, or as a way to highlight craftsmanship, the quarter round will never go out of style.
| Profile Type | Dimensions | Best Used For |
| Quarter Round | 3/4″ × 3/4″ | Covering large expansion gaps in laminate & hardwood |
| Shoe Molding | 1/2″ × 3/4″ | A sleek, less obtrusive look on baseboards |
There are several approaches for installation, and today we’ll cover what you need to know for a successful project.
Best Way to Install Quarter Round Molding

There are three approaches to installing quarter round molding:
🚀 Select Your Installation Method Below to Skip Ahead:
* Click on the above links to jump to your favorite method.
The most common method of attaching quarter round and shoe molding trim are by using a power nailer. However, I know many home owners are looking for alternative ways to do it without using a power tool. I am going to explain all the 3 methods in detail.
The “best” approach is certainly up to the individual, so let’s dive into the differences!
But first, let’s see some of the important preparations that you need to make before you install a shoe molding or quarter round.
Related: Difference between quarter round and shoe molding.
Installation Preparation
The prep work for all three installation options is the same:
Tools You Need
- Safety Gear: Safety glasses, kneepads, ear protection.
- Measuring & Marking: Pencil, tape measure, painter’s tape.
- Cutting: Miter saw with a finish blade (or a manual miter box).
- Possible additional tools: Coping Saw, angle finder, 90 degree square
Prep Steps
- Make sure your work area is clean and clear of debris. Vacuum the edge of the floor where it meets the wall, and make sure there’s no tape or goo on any surfaces you’ll be working on.
Note: if using wood for your quarter-round instead of a composite material, it’s a good practice to allow it to acclimate in the workspace for 24 hours before cutting! - Upon entering the workspace where you’re installing the quarter-round, start from your immediate left to begin taking measurements, and work your way around the space clockwise, one wall at a time. I like to take my measurements all at once, and then cut my list all at once.
Keep a short piece of the trim you’ll be using with you, as it will be handy when measuring for pieces around outside corners.
- Take your measurements left to right like you read, indicating as you go which side of each piece is a blunt edge, inside corner, outside corner, or return. Everyone has their own shorthand, but for example, 1) In 73” Out, 2) out 22” out, 3) out 18” in. This will help you know how to angle the edges of your pieces when you begin to cut your pieces to size.
- Use that scrap piece of trim to hold against the opposite 90-degree edge for outside corners to be sure you have the proper width of the trim factored in. If you are still unsure, mark down ½ ″ longer for that piece. You can always shave something down, but you can’t put more material back on once it’s been cut off.
- When cutting your pieces, I find that the best approach is to use your chop saw to cut at 44-degree angles for inside corners, and a 46-degree angle for outside corners. This is because drywall corners, by the nature of their own installation, are rarely a true 90 degrees, and thus neither is the baseboard. Rather than using excessive caulk or multiple cuts to get a perfect match or cover up an imperfect one, this 44/46 method works great for most all corners.
If your blade isn’t a finish blade, or if your material is getting nicked, wrap a piece of painter’s tape around the end and make your measurements on that, and cut through it to cut to length. This will keep the cut edge clean from damage. - If a corner seems more than a little bit off, check it with your 90-degree square, and then use an angle finder to get the exact measurements for your cuts.
Alternatively, for an odd inside corner, fit one piece of quarter round into the corner with a blunt edge, and cut the other at a 45. Use a coping saw to shave the underbelly of the piece along the cut edge, and then place the piece on top of the blunt-edge piece. Bam! Clean and perfect inside corner.
- Number the back of each cut piece in pencil as you go, corresponding to your cut list. You will often have pieces that at first glance will look of similar length, and this will save you time trying to sort through a pile and find your “glass slipper” piece every time you come to a new wall section.
- Dry-fit each piece of your quarter-round trim, and make sure they all fit where they’re supposed to, all the way around the workspace. It’s important to do all the pieces at once, so you can see if any changes or alterations need to be made prior to permanently fastening the pieces.
- If all looks good, you’re now ready to move on to the next phase of fixing the quarter-round to the wall!

Installation Using Nail Gun
Tools You’ll Need
- Pneumatic or Cordless Brad Nailer (18 gauge)
- Wood putty or caulk
- 1 ½ ″ – 2″ nails (18G)
- Air compressor and hose
- Hammer and Nail Set
- Wood putty or caulk

With Nail Gun: Installation Steps
1. Connect Your Power Nailer
Power up your compressor, getting it to the proper PSI for the nail gun you are using. Load your nail gun and make sure the depth is correct. These days, there are also brad nailers that are cordless and battery powered, so this compressor step may not be necessary for all!
2. Position the Molding in Place
Kneel down next to your first piece of quarter round, holding the tip of the nail gun almost parallel to the floor, but with a slight downward tilt.
3. Nail Slightly at an Angle
Keep the brad nailer close to horizontal, but keep tilted slightly towards down.
Make sure to shoot into the middle of the piece and not the edge (to minimize the chance of splitting), and to shoot into the baseboard and NOT the floor. Most newer replacement hardwood floors need to be able to float and expand and contract, so locking it into place with a bunch of tiny nails would not be a good move!
4. Spacing Between Nails
A good rule of thumb is to never go closer to the end of a piece than 3″, and to try and space your nails between 1 to 2 feet. I typically space them about 15-20″, unless I’m working with a particularly warped old wooden floor that requires more precise attention.
Don’t worry about trying to find a stud, because the bottom plate of the wall will be running along the floor at the appropriate height just behind the baseboard and drywall.
5. Complete the Nailing
Work around the room, and when you’ve shot in all the pieces, go back and use a hammer and nail set to lightly countersink any nails that are protruding from the surface of the trim.
6. Fill the Gaps
Use wood putty or caulk to lightly fill in nail holes with your fingertip, and use a very thin bead of caulk to seal the upper edge of the trim to the baseboard.
7. Finish the Installation
Do any touch-up paint necessary for a clean finish. All done!
Nail Selection
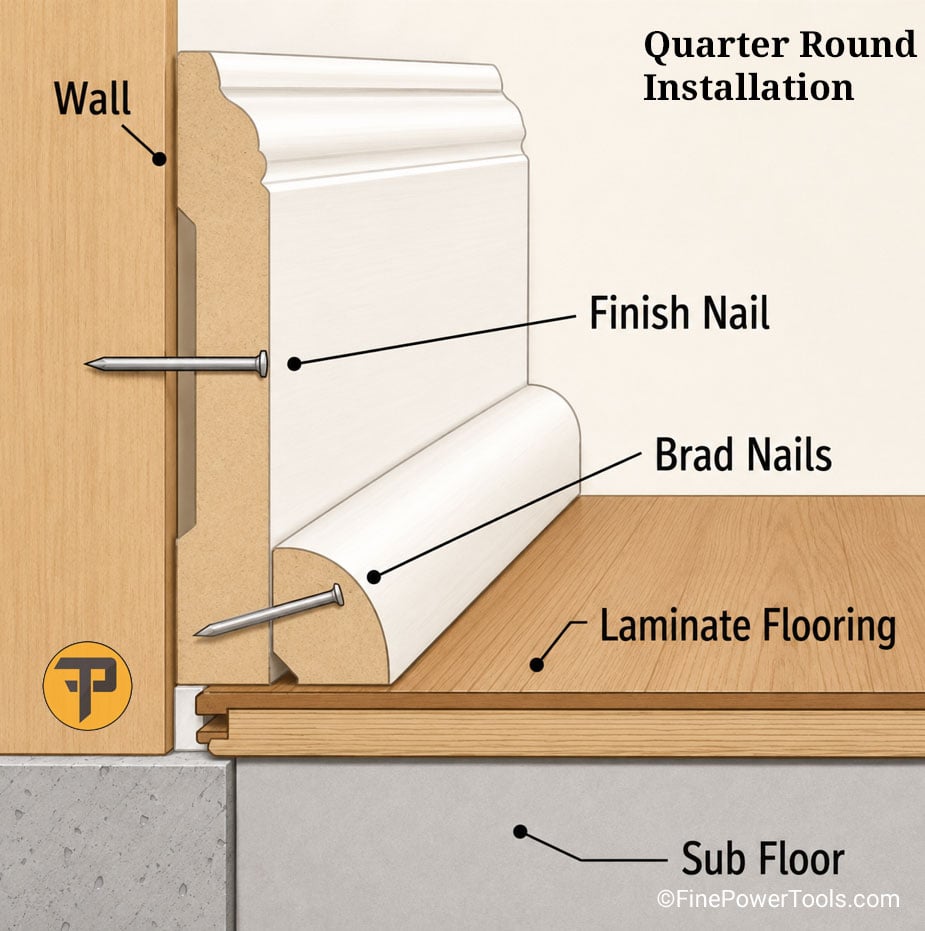
While you can use the 16-gauge finish nails for trims, they are often too thick for delicate MDF or thin wooden quarter round and can split the trim. I recommend you use 18-gauge brad nails with installing quarter round with a nail gun.
Nail Length Formula
Your ideal nail length depends on whether you are attaching the quarter round to an existing baseboard or directly to the wall:
- Scenario 1: Attaching to a Baseboard (Recommended): If your room has standard wood or MDF baseboards, you only need to anchor directly into that wood profile. Use 1-1/4″ to 1-1/2″ brad nails. Going longer risks over-penetrating into hidden wall utilities.
- Scenario 2: Attaching Directly to Drywall (No Baseboard): Drywall cannot hold a nail. If you are mounting the trim directly to the wall line, you must use 1-1/2″ to 2″ brad nails so the fastener can pass through the drywall and bite into the solid wood bottom plate framing.
Nail Length = Trim Thickness + Baseboard Thickness + ~1″ Wall Penetration
By ensuring your 18G brad nail is long enough to penetrate the wall plate, you prevent the quarter round from pulling loose over time, while keeping it independent of the floating floor beneath it.
For standard installation, 1-1/4″ to 2″ brad nails are usually the sweet spot.
Quarter Round Installation Without Nail Gun
As explained earlier, there are two ways of installing without using a power tool. The first and the obvious method is to use hammer and nail-set to drive the nails in place. The second technique is to use glue to attach the trim.
Method #1: Manual Installation (Hammer & Nail)

Tools You Need
- Hammer
- Drill and pilot bit slightly smaller than nail gauge
- Painters tape
Manual Nailing Installation Steps
1. Do a Test
Depending on the gauge of nails you’re using, you may want to use a drill and pilot hole to help avoid splitting the piece. With thicker nails, a pilot hole is recommended. With thinner finish nails, you may just be able to go without. Try a test on scrap beforehand if you aren’t sure!
2. Drill Pilot Hole
To drill a pilot hole for the nails, stick a small piece of paper tape over the wood where you’d like the nail to go. Gently drill a small hole about 80% of the way through the piece of trim.
3. Hammer the Nail
Grab your hammer and finishing nails, and give the nail a couple taps, until it is sitting about ⅛ inch above the surface of the trim.
4. Use Nail Set
Find the nail set that best fits your nail head, and countersink it until it is in past the surface of the trim.
5. Complete the Nailing by Hand
Work your way around the room as with the steps above for powered installation.
6. Caulking
Use putty or caulk to smooth out the surface of the trim, and sand or wipe away any excess.
7. Finishing
Clean the trim and baseboard and paint them if necessary. Finishing touches, and all done!
Installing Quarter Round Without Nails
Method #2: Adhesive Installation
Now, installing quarter-round with an adhesive is slightly less straightforward than the other two approaches. There is more than one material that can affix the trim to the baseboard, and it’s ultimately up to the installer what to use!
I’ve used both Liquid Nails and PL Premium Construction Adhesive in the past. They both offer solid results for this application, but at pretty different price points.
Additionally, you may be working on a space with a curved surface (around a staircase) or in a bathroom where you might not want wood or a composite material that can swell when wet.
Flexible Quarter Round
Perhaps you just want the quickest, easiest option for quarter-round trim requiring a minimum of extra tools. The flexible adhesive quarter round available on the market today is a more expensive, but more practical option that doesn’t require any additional adhesion for installation, and is water safe!
This trim is truly a peel-and-stick solution. It isn’t in every hardware store, but it is easily found online.
For traditional adhesive application, installation instructions follow below:
Tools You Need
- Painters tape
- A piece of cardboard
- Medium-grit sandpaper
- Your Adhesive of Choice and a caulk gun if necessary
Adhesive Installation Steps
- Make sure your working surface is extra, extra clean. Vacuumed, wiped down, etc. This is most important for this installation type.
- Take your medium-grit sandpaper and sand down the back of each piece of trim, about five passes to get it roughed up.
- Take your wedge sanding block and (very carefully) rough up the bottom ½ ″ or so of the baseboard, taking care to not scuff the flooring or any higher up the baseboard. Using the wedge sanding block will give you more control than sandpaper or a square block.
- Vacuum up any excess dust created by the sanding. This roughed-up surface on both sides will help the adhesive “grab” and create a better seal.
- Apply the adhesive uniformly across the entire surface, being sure to not use too much. The adhesive will of course spread out when applied with pressure to another surface, so avoid excess in the application. Be sure to apply the adhesive evenly instead of in dots or dashes, as that could create an incomplete seal and cause the trim to pop off over time.
- Line up the trim in its space, and gently apply pressure for about a minute before moving on to the next piece.
- Once the room is completed, wipe away any excess adhesive from your flooring or trim with a damp cloth. Allow the molding to cure for 12-24 hours. All done!
The argument could be made that this installation technique is the fastest, as there is no puttying of nail holes or caulking required. One could follow up with caulking along the seams, but the adhesive creates enough of a seal that it isn’t really necessary, except if aesthetically desired.
Dan’s Tips for Clean Finish
To make your trim work look like it was installed by a master carpenter, implement these three pro finishing techniques:
- Use a “Miter Return” at Door Casings
Never leave raw end-grain exposed where the molding terminates. Cut a 45-degree angle on the main piece facing the wall, then glue a tiny, opposing 45-degree scrap wedge into the gap. This cleanly wraps the molding back into the wall line.
- Glue Outside Miters Before Nailing
Wood swells and shrinks with seasonal humidity. Apply a small bead of quality wood glue or thick CA glue to both faces of an outside miter joint before pinning them. This keeps the corner tight and prevents it from pulling apart later.
- Keep Your Caulk Lines Crisp
Run a very thin bead of paintable latex caulk along the top seam where the trim meets the baseboard. Smooth it with a damp finger, then immediately follow behind with a clean, damp rag. This highlights the sharp profile of the molding instead of burying it under sloppy caulk.
So, Which Method is Best?
While I always maintain that it’s up to the installer and their space, I personally prefer the nail gun approach.
- it’s fun and easy to use a nail gun and
- It’s the method I’m most comfortable with.
However, if you live in an apartment or other space where you can’t be making that much noise, or if you just don’t have access to or comfort with those tools, either the hand-nailing or adhesive options are both solid approaches! Let us know below which you prefer and why.
Back to Contents

Dan Miller is a professional toolmaker with extensive experience in the metalworking and tooling industry.
An avid DIY enthusiast and passionate hobbyist woodworker, Dan shares his expert knowledge here.