
Soldering irons use a resistor to generate heat to melt solder. This can be used for several applications, and the temperatures they can reach vary depending on the solder and their intended purpose.
In this article, I will cover some topics to help you better understand these practical tools.

How Hot Do Soldering Irons Get?
Electric soldering irons’ temperature varies depending on the model and power measured in watts. They usually reach temperatures that go from about 150°C to 480°C (300°F to 896°F).
This is as hot as a heat gun.
As we saw in an earlier entry, users have found several creative ways to use soldering irons. But, soldering irons’ main purpose is to melt solder to create consistent joints without melting, burning, or causing damage to the components being joined, as well as any nearby objects.
All these being said, it’s important to understand that soldering irons are not designed to melt other metals than different types of solder, and attempting to do so not only won’t work, but it can be dangerous as it can damage the solder, start a fire, or worse.
A soldering iron, as its name suggests, is made to solder, not weld, and it shouldn’t be used for that purpose. Welding is a different process that involves melting the base metal parts to be joined, which requires very high temperatures, and a soldering iron won’t work to do the job.
Heat-Up Time
Heat-up time is the time it takes for a soldering iron to reach its desired operating temperature from a cold start. It’s an important factor to consider when using a soldering iron because it has a significant impact on the quality and efficiency of the soldering process.
The heat-up time of a soldering iron can vary depending on several factors, such as the iron’s power rating, the type of heating element, the thermal properties of the tip, and the soldering iron. Soldering irons with higher power usually have shorter heat-up times compared with lower-powered models.
During this phase, the heating element inside the soldering iron converts electrical energy into heat. As the element heats up, the temperature of the soldering iron gradually increases until it reaches the desired temperature for soldering. Once the soldering iron reaches its operating temperature, it’s ready to start soldering.
Soldering irons and stations with temperature control monitor the tip’s temperature and alert users that the desired temperature has been reached.
The Role of Flux

Flux is an indispensable part of the soldering process as it acts as a chemical cleaning agent. Flux removes oxidation from the surfaces of the metals to be joined adequately.
But you are probably unaware is the fact that flux also helps distribute heat evenly across the joint. This even heat distribution ensures a smooth, reliable connection, which is particularly important in electronics soldering where even a minor flaw can cause significant performance issues.
Tinning the Tip
This vital step in soldering involves applying a thin layer of solder onto the soldering iron’s tip. This procedure enhances heat transfer as coating the tip with solder makes the tip a better conductor of heat, allowing an efficient temperature transfer from the tip to the solder joint, helping to achieve the right temperature quickly, ensuring a smooth soldering process, and creating a reliable connection.
Besides, tinning helps to protect the tip from oxidation and corrosion. When the tip is exposed to air, it tends to develop a layer of oxide that affects its performance. Tinning creates a barrier between the tip and the air, preventing direct contact and reducing the chances of oxidation. This means the iron tip will last longer and stay in good working condition.
Tinning also promotes solder wetting, which is how well the solder spreads and adheres to the surfaces being soldered. When the tip is properly tinned, solder flows smoothly, creating strong and reliable electrical and mechanical bonds between the components being soldered. Last but not least, it’s a good practice to tin the tip before and after each soldering session to ensure that your solder’s tip is always clean and ready to deliver optimal performance.
Optimal Temperatures for Soldering

As mentioned earlier, heating up time and allowing the soldering iron to reach the right temperature is essential for an efficient job. This temperature varies depending on the parts you are working with and the kind of work you are doing. For example, joining electronic components to a PCB doesn’t need as much heat as wood burning, as we are about to see.
In the case of soldering irons, higher temperatures are not necessarily better, as it happens with other tools when high power is a synonym for high performance.
The shape and material of the soldering iron tip also impact the temperature, performance, and precision of a soldering iron, so it’s important to consider what kind of job you will be doing to determine what are the best solder tip and wattage needed to do the job safely and efficiently.
Soldering Temperatures for Different Applications
Below you will find a list of different soldering iron applications and the recommended temperature settings to do the job effectively:
- Electronics and PCB Soldering
When working with electronic components and printed circuit boards, it’s important to consider the type of components and board you are working with. Many components are very sensitive to temperature; they can get damaged if exposed to high temperatures or lower temperatures for too long.

There are two ways of attaching components to a board:- Through-Hole Assembly
The board has holes for the components’ leads or pins to go through them (usually known as “through-hole” assembly). In these boards, once the leads or pins go through the holes, they are soldered from the bottom of the PCB, creating a secure electrical and mechanical connection.
To solder these components, a temperature between 310°C and 380°C is usually enough and safe for both the components and the PCB. - Surface Mount Technology:
Most devices (usually mass-produced boards or small circuits) use a different system. The components are soldered into the board without using holes and are soldered to the top of the board. The components used in these boards are called SMD (Surface-Mount Components) or SMD (Surface-Mount Devices). These components are soldered straight to the board’s surface.
These components require less temperature and are usually more sensitive to heat; they usually are soldered using no more than 270°C degrees.
- Through-Hole Assembly
- Soldering Copper
Copper is used in plumbing, electrical work, and metalwork applications, where secure connections and reliable joints are essential for effective performance. By soldering copper, you can ensure durable and efficient connections in these applications.
You can melt copper surface using a soldering iron with enough power to generate about 350°C (662°F) to 400°C (752°F). A 60 to 100 Watts soldering iron, combined with a sharp tip, is ideal for this task. - Stained Glass and Mosaics
Even when butane soldering irons are better for this task as they achieve higher temperatures, an electric soldering iron with a wide tip will do the job as you use it as long as you use a solder made of tin and lead. To melt this solder, you need a temperature of about 360°C (680°F) to 380°C (716°F). - Jewelry Making and Repair
For this task, you will need multiple tips, and the temperature varies depending on the materials being soldered. The lowest temperature you would need is 300°C (572°F) and 400°C (752°F) the highest. - Engraving and Wood Burning
Soldering irons are also used for engraving decorative pieces and woodburning. Wood is easy to burn, so you shouldn’t use more than 250°C (482°F) to 300°C (572°F).
Some woods and materials require 400°C (752°F) or more; in those cases, it’s best to use a butane soldering iron or a dedicated pyrography tool that can produce more heat.
You could also get an engraver, or a rotary tool like Dremel to do the engraving. - Working with Plastic
Soldering irons shouldn’t be used for welding metals but are practical for welding plastics or repairing parts like automotive central consoles and other plastic pieces.
ABS (Acrylonitrile Butadiene Styrene) and PVC (Polyvinyl Chloride) are the most common automotive plastics. These plastics melt at temperatures starting from 150°C to 250°C (392°F to 482°F).
Using a low-power soldering iron is recommended to prevent burning or damaging the parts. - Lead-Free Solder:
Since the health risks of lead exposure are real, you would want to use lead-free solder. The downside is that the lead-free solder generally requires higher temperatures than traditional tin-lead solder, with its melting point around 428°F to 473°F (220°C to 245°C.)

Recommended Temperature Chart
The following chart shows the right soldering temperature in Fahrenheit and degree celcius for the most common uses.
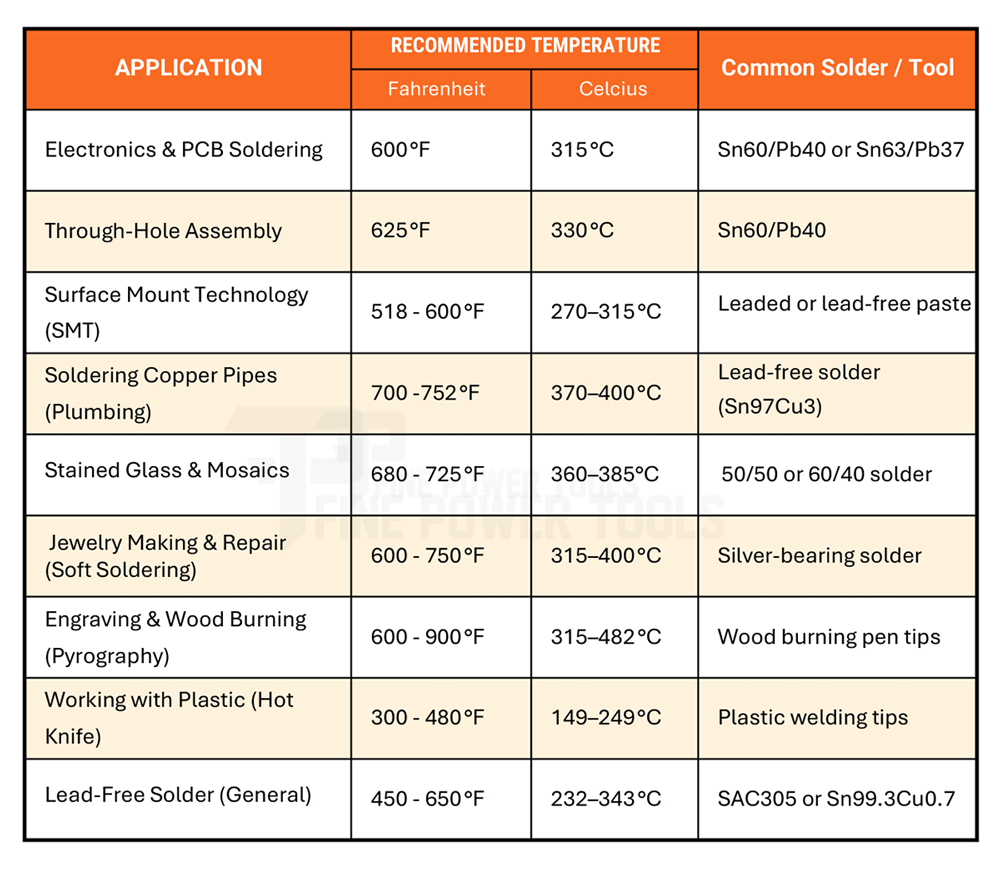
You can download the pdf version below.
Safety Precautions
Safety should always be a priority when working with hot soldering irons.
- To start, ensure that you’re working in a well-ventilated area since soldering can produce potentially harmful fumes, particularly when using solder that contains lead.
- Always wear safety goggles to protect your eyes from accidental splashes of molten solder.
- Avoid touching the tip of the hot soldering iron, as it can cause severe burns.
- Do me a favor; get an inexpensive soldering iron stand. When not in use, place the hot iron in the holder for safety.
- It’s crucial to let the iron fully cool down before storing it away to avoid potential accidents or damage.
Closing Notes:
Soldering irons are versatile tools that have many uses besides electronics. It’s essential to know the melting point of the materials or solder before starting to work to ensure a smooth and safe process.
If you are working with electronic components and wires, always remember to tin the tip before and after finishing working to preserve your soldering iron’s tip. When working with other materials and in other tasks like welding plastic or engraving, don’t forget to clean the tip after you finish, to ensure that it is free from any residues that may damage it.
Back to Contents

David Castillo is an automotive industry expert specializing in vehicle electronics and stand-alone fuel management systems. He has over 20 years of experience and owns a car repair garage and tuning shop.
David still runs his shop but is now more focused on pre-purchase car inspections and writing for FinePowerTools.