
Large panel glue-ups might look simple. That is until the clamps come off and everything starts sliding and sticking to the wrong thing.
Picture this:
You have applied glue and all your boards are neatly arranged. Minutes later, you’re fumbling with the boards while glue slowly cures in the background like a tiny ticking clock.
But I have good news for you..
You can prevent most of the panel glue-up mistakes.
The following five woodworking tricks and a few simple shop habits take almost no extra time, but they can dramatically improve your next tabletop glue-up or any glued-up wood panel project.
Tip #1: The Offset “V-Mark” Technique
The Problem
You spend an hour carefully arranging your boards to create the perfect grain pattern for a tabletop or workbench top. Everything looks great. Then the glue comes out.
Suddenly the pressure is on.
Boards get flipped around. One rotates the wrong way, another one gets swapped left-to-right. It wouldn’t be a problem when you only have two or three pieces of lumber. But as the number of pieces in the glue-up increases, it’s surprisingly easy to lose track of your layout and ruin an otherwise clean panel.
The Trick ⚒
- Before you even open the glue bottle, arrange your boards exactly how you want them in the finished panel. You might want to move the individual boards to match the grain and color.
- Then take a Carpenter’s pencil and draw one large asymmetrical “V” across the face of all the boards together.
- Important: Do not center the mark. Shift it noticeably toward one side of the panel.
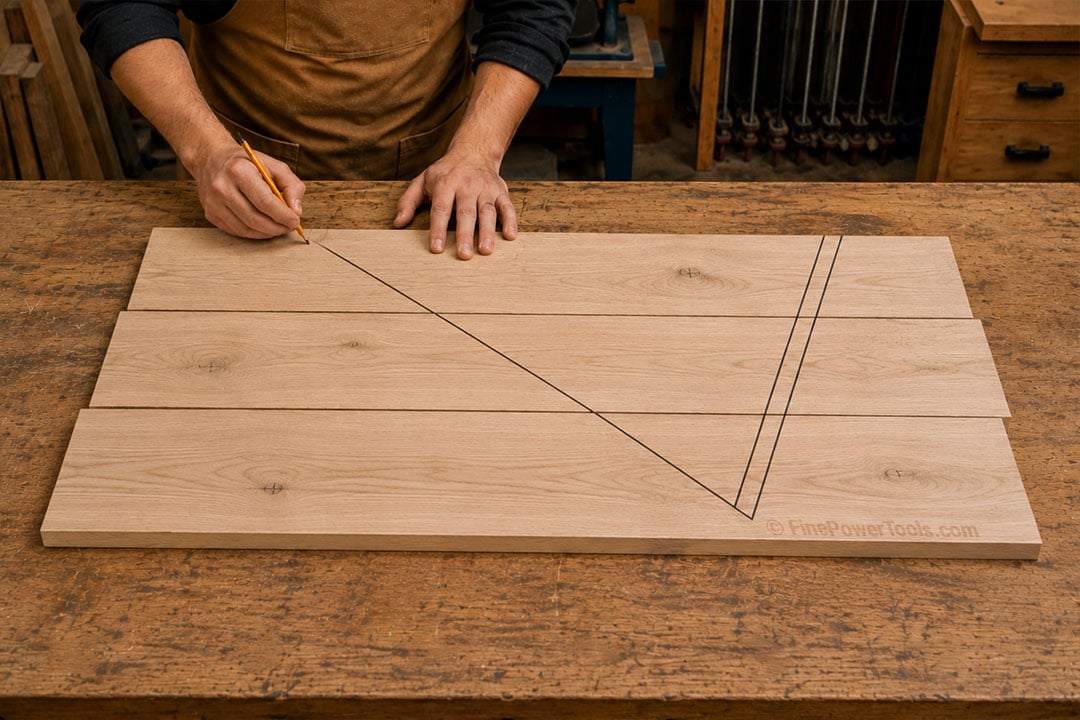
Some woodworkers use a traditional cabinetmaker’s triangle for the same purpose. I found that an offset V-mark works especially well because it also prevents accidental board rotation.
Why It Works
Once the boards are separated for glue application, your carefully planned layout instantly turns into a confusing pile of lumber.
The offset V-mark acts like a puzzle guide.
During clamp-up, you simply realign the boards until the “V” reforms correctly. Because the mark is shifted to one side, any flipped or rotated board becomes obvious immediately. The lines no longer match.
It takes about five seconds to draw, costs nothing, and prevents one of the most common beginner mistakes during a panel glue-up.
Tip #2: Mill Your Edges Before You Reach for Clamps
Before edge-gluing boards, I always joint the mating edges to make sure they are square and straight. If the edges are not at 90° to the thickness, the boards can drift during clamping and create uneven seams or a twisted panel.
A properly jointed edge makes the entire glue-up process easier.
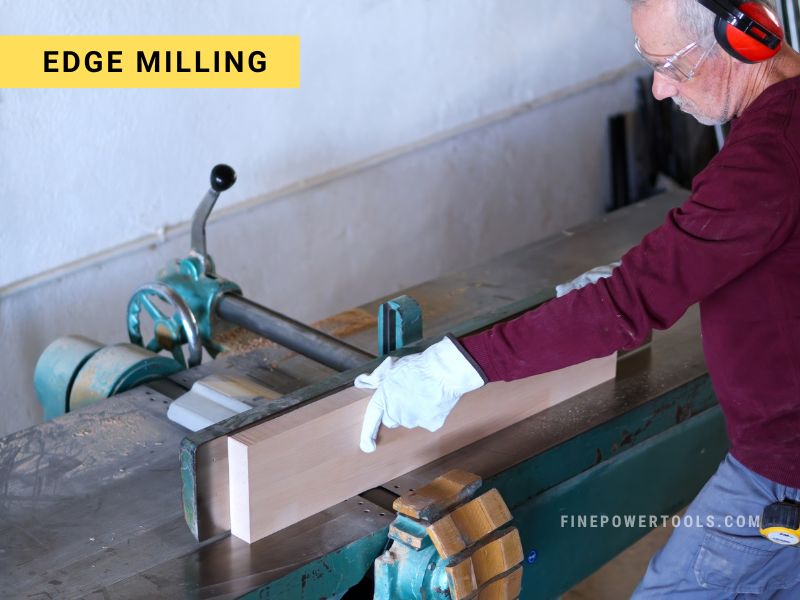
If you do not have a jointer in your shop, you can do this on your table saw. Just make sure that you use the push sticks and do it carefully.
Some woodworkers also add a slight “spring joint” to the edge. This creates a barely visible hollow in the center of the board so clamp pressure pulls the ends tightly together during glue-up.
It’s a useful traditional technique.
That said, I don’t do it. If the boards are milled accurately and the clamps are balanced properly, modern wood glue does an excellent job on its own.
Note: Wood Movement & Grain Direction
Wood movement is where panel glue-ups become challenging.
Even a perfectly glued panel can warp later if the lumber was not properly acclimated before milling and assembly. Letting wood stabilize to your shop environment before glue-up reduces surprises later.
Grain orientation also affects how a glued-up panel behaves over time.
Keeping all the growth rings facing the same direction increases the chances of the entire panel cupping slightly in one direction under changing moisture conditions.
Many woodworkers alternate growth ring direction from board to board because, in theory, opposing movement should help balance the panel as humidity changes. And if you’re bookmatching boards, the grain orientation naturally alternates anyway because each board is flipped like pages in a book.
But here’s the catch:
Alternating growth rings can sometimes create a subtle “washboard” surface where neighboring boards rise and fall differently over time.
In practice, there is no perfect formula. I am with the English woodworker here. I normally give preference to the appearance and for critical projects, I would let those boards acclimate to the shop’s conditions.
Tip #3: The Packing Tape Caul Hack
The Problem
When tightening pipe clamps or F-clamps across a large glued-up panel, the pressure can force the boards slightly upward or downward. Instead of a flat tabletop, you end up with uneven seams and a panel that needs excessive sanding later.
That’s why woodworkers often use cauls. These are straight scrap boards clamped across the top and bottom of the panel to keep everything aligned during glue-up.
But there’s a catch:
Glue squeeze-out can permanently bond the cauls to the panel itself.
⚒ The Hack
- Before using wooden cauls, wrap them in ordinary clear packing tape.
- Then set up your glue-up normally. Position the taped cauls across the panel seams and clamp them lightly across the top and bottom surfaces.
- For best results, use straight cauls and moderate clamp pressure. Over-tightening clamps can still distort a panel or force boards out of alignment.
Why It Works
Wood glue bonds aggressively to raw wood fibers, but it will not reliably stick to the slick plastic surface of packing tape.
As glue squeezes from the seams, it presses harmlessly against the taped cauls instead of bonding to them.
Once the glue cures, the cauls release cleanly instead of becoming accidental permanent attachments to your tabletop.
Simple trick. Huge cleanup savings.
Tip #4: The 20-Minute Glue Cleanup Trick
The Problem
After clamping a wood panel, beads of excess glue appear along every seam. That’s normal. In fact, it usually means you applied enough glue.
The problem is cleanup.
Beginners usually make one of two mistakes:
- Wiping the Glue Immediately With a Wet Rag
This spreads diluted glue deep into the wood pores. The surface may look clean at first, but those invisible glue traces can interfere with stain absorption later and create blotchy finish spots. - Waiting Until the Next Day
Fully cured glue becomes extremely hard and brittle. Removing it later often requires aggressive scraping or sanding, which wastes time and clogs sandpaper quickly.
The Trick ⚒
- Instead of wiping immediately or waiting overnight, set a timer for about 20 to 30 minutes after clamping your panel.
- Walk away for a bit, enjoy your coffee!
- When you return, the glue should feel rubbery rather than liquid. Use a sharp paint scraper or stiff putty knife held at a low angle and gently slide it along the seam.
Why It Works
At this stage, the glue has skinned over and firmed up, but it hasn’t fully cured yet.
That creates the ideal cleanup window.
The glue usually lifts away in long rubbery strips instead of smearing into the wood or chipping into hardened chunks. After scraping the bulk away, lightly wipe the seam with a barely damp cloth to remove any remaining residue.
The result is a cleaner glue line, easier sanding, and fewer finishing problems later.
Tip #5: Pencil Squiggles Technique for Sanding
The Problem
Once the glue-up is complete, the next challenge is flattening and sanding the panel evenly. This is where many beginners accidentally create dips and uneven spots.
A random orbital sander removes material surprisingly fast. Stay in one area too long and you can create shallow valleys that become painfully obvious after applying stain or finish.
At the same time, it’s easy to miss rough areas entirely.
The Technique
- Before sanding, lightly draw loose pencil squiggles across the entire surface of the panel.
- Make sure the marks cross glue seams and extend all the way to the edges.
- Then begin sanding with your starting grit, usually 80 or 120 grit, using slow overlapping passes while keeping the sander flat on the surface.
Why It Works
The pencil marks act as a simple visual depth gauge.
As you sand, the marks disappear from high spots first. Areas where pencil remains indicate low spots or sections that still need attention. Once the pencil marks disappear evenly across the panel, you know the surface has been sanded consistently.
One important note: If a tiny pencil mark refuses to disappear after extended sanding, stop and check the panel with a straightedge before removing more material. Chasing microscopic low spots too aggressively can create uneven surfaces.
Once the surface looks even, move to the next grit and repeat the process until the panel is smooth and ready for finish.
Final Thoughts
None of these woodworking tricks require expensive tools or advanced joinery skills. They’re simply small habits that make panel glue-ups more predictable and less frustrating.
And honestly, that’s half the battle in woodworking.
A clean tabletop glue-up rarely comes from luck. It comes from preparation, careful clamp pressure, and knowing how to avoid the small mistakes that cause big headaches later.
Because once the glue comes out, the clock starts ticking.
Back to Contents

Dan Miller is a professional toolmaker with extensive experience in the metalworking and tooling industry.
An avid DIY enthusiast and passionate hobbyist woodworker, Dan shares his expert knowledge here.